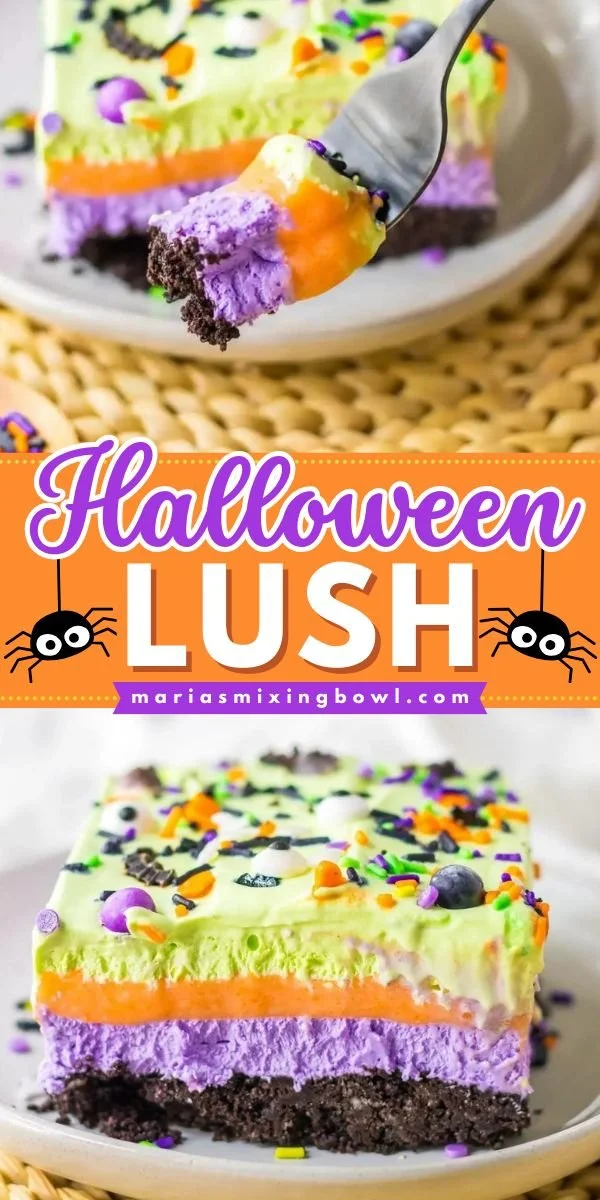
This Halloween Lush recipe is a delightful dessert that captures the spirit of the season while offering a refreshing and fun treat. With its creamy layers and delicious flavor, it’s perfect for parties, family gatherings, or simply satisfying your sweet tooth. Easy and visually impressive, this dessert will be a hit among both kids and adults alike.
Why You’ll Love Halloween Lush
- Layered Desserts: The beautiful layers of cream cheese, vanilla pudding, and Cool Whip create an eye-catching presentation that makes serving a breeze.
- Quick to Make: This recipe comes together in no time, allowing you to prepare a delicious treat without spending hours in the kitchen.
- Kid-Friendly Fun: Perfect for Halloween, this dessert is colorful and can even be decorated with festive toppings, making it a fun activity for kids to participate in.
- No-Bake Delight: Since it’s a no-bake dessert, you don’t have to worry about turning on the oven, keeping your kitchen cool while still enjoying a captivating dessert.
- Customizable Layers: The layers are not only delicious but also a blank canvas for your creativity. You can easily modify the flavors or colors to suit your taste or theme.
Recipe Overview
- Prep Time: 20 minutes
- Cook Time: 0 minutes
- Total Time: 2 hours (including chilling)
- Servings: 8
- Difficulty Level: Easy
Ingredients You’ll Need for Halloween Lush
- Oreo Cookies: 24 whole cookies, crushed (great for a chocolatey crust)
- Butter: ½ cup, melted (binds the crust together)
- Cream Cheese: 8 oz, softened (adds richness and creaminess)
- Powdered Sugar: 1 cup (sweetens the cream cheese layer)
- Cool Whip: 8 oz, thawed (adds lightness and airiness)
- Vanilla Pudding Mix: 1 package (3.4 oz) (creates a creamy pudding layer)
- Milk: 2 cups (to prepare the pudding)
- Food Coloring: Optional (for layered color fun)

here
How to Make Halloween Lush
-
Make the Crust
Crush the Oreo cookies in a food processor or by placing them in a plastic bag and using a rolling pin until finely crushed. In a mixing bowl, combine the crushed Oreos with melted butter. Press the mixture firmly into the bottom of a 9×13 inch serving dish to form a crust. -
Prepare the Cream Cheese Layer
In a separate bowl, beat the softened cream cheese and powdered sugar together using an electric mixer until the mixture is smooth and creamy. Gently fold in half of the Cool Whip, being careful not to deflate it too much. Spread this mixture evenly over the crust layer. -
Make the Pudding
In another bowl, prepare the vanilla pudding according to the package instructions, whisking the pudding mix with 2 cups of milk until it thickens. If you want to make it colorful, you can add a few drops of food coloring to achieve your desired effect before pouring it into the dish. -
Layer the Pudding
Pour the prepared vanilla pudding over the cream cheese layer. Use a spatula to smooth it out evenly. -
Top with Cool Whip
Spread the remaining Cool Whip over the top of the pudding layer, creating a smooth and fluffy finish. If desired, add festive decorations like sprinkles or Halloween-themed candies for an extra pop. -
Chill and Serve
Refrigerate the dessert for at least 2 hours or until it is fully set. Cut into squares and serve chilled.
Tips for Success
- Use Softened Cream Cheese: Make sure your cream cheese is softened to avoid lumps in your mixture. Leave it at room temperature for about 30 minutes before using it.
- Press Crust Firmly: Press the Oreo crust firmly into the pan. This will help it hold together when serving.
- Chill Well: Allow sufficient time for the dessert to chill and set in the refrigerator for the best texture and taste.
- Mix Gradually: When folding in the Cool Whip, do so gradually to maintain a light and airy texture.
- Taste Adjustments: Feel free to taste your layers as you prepare them and adjust the sweetness if desired.
Easy Variations
- Flavored Pudding: Substitute vanilla pudding with chocolate or butterscotch pudding for a different flavor profile.
- Fruit Layers: Add layers of fresh fruit like sliced strawberries or blueberries for a refreshing twist.
- Dairy-Free Option: Use dairy-free cream cheese and non-dairy whipped topping to make this dessert lactose-free.
- Chocolate Crust: Replace Oreos with chocolate graham crackers or any chocolate cookie for an alternative crust flavor.
- Additional Toppings: Experiment with different toppings such as chopped nuts, mini chocolate chips, or seasonal candies to add texture and flavor.
What to Serve with Halloween Lush Recipe
- Pumpkin Spice Lattes: The warm spices in pumpkin lattes complement the refreshing flavors of the lush.
- Spooky Cheese Platter: A mix of cheeses with crackers and fruit can round out the dessert for a well-balanced snack table.
- Chocolate-Covered Pretzels: Their salty note pairs perfectly with the richness of the lush.
- Apple Cider: Serve alongside warm or chilled apple cider for a comforting seasonal drink that enhances the Halloween theme.
- Halloween-themed Snacks: Items like popcorn balls or candy corn can create a festive atmosphere that aligns with your lush.
Storage and Reheating
- Refrigerator Storage: Store any leftovers in an airtight container in the refrigerator for up to 3 days.
- Freezer Storage: This dessert can be frozen for up to 2 months. Wrap it well and ensure airtight storage to prevent freezer burn.
- Thawing: To enjoy frozen leftovers, transfer them to the refrigerator a few hours before serving to allow them to thaw safely.
- Texture Preservation: Keep the toppings separate when freezing, as they may become soggy upon thawing. Add fresh Cool Whip right before serving for the best texture.
Common Mistakes to Avoid
- Skipping the Chill Time: Not allowing enough time in the fridge could result in a runny dessert.
- Using Cold Cream Cheese: Cold cream cheese can lead to lumps. Always soften it first.
- Overmixing the Cool Whip: Being too aggressive while folding can make the mixture lose its airiness.
- Not Pressing the Crust Firmly: A loose crust may fall apart when cutting or serving.
- Ignoring Storage Tips: Failing to cover the lush properly can cause it to absorb fridge odors and lose its flavor.
Halloween Lush: Background & Cultural Inspiration
The Halloween Lush is inspired by a classic American dessert tradition known as "lush" or layered desserts. This style emerged from a desire to combine different textures and flavors, creating an engaging experience for the palate. With its roots in potluck gatherings, the Halloween version adds a seasonal twist, enticing people to experiment with colors and presentation. It reflects the playful spirit of Halloween, bringing together deliciousness and creativity in a single dish. As you enjoy this treat, you are partaking in a celebration that embraces both the artistry and community feel of dessert-making.
Frequently Asked Questions
Can I make Halloween Lush ahead of time?
Yes, you can prepare it a day in advance. Just be sure to cover it and keep it in the refrigerator until you’re ready to serve.
Can I use a different cookie for the crust?
Absolutely! Other chocolate cookies or even graham crackers can be delicious alternatives for the crust.
Is there a way to make this recipe lower in sugar?
You can use sugar-free pudding mix and Cool Whip to reduce the sugar content while still enjoying the delightful flavors.
How long will the Halloween Lush last in the fridge?
It will typically last for about 3 days in the refrigerator when stored properly in an airtight container.
Can I use homemade whipped cream instead of Cool Whip?
Yes, homemade whipped cream can be used as a substitute and will add a fresh flavor to the dessert.
Final Thoughts
This Halloween Lush recipe is a delightful way to celebrate the season with friends and family. Its creamy layers and festive appearance make it not only a treat for the taste buds but also a beautiful centerpiece for your Halloween festivities. With its ease of preparation and endless possibilities for creativity, this dessert is definitely worth a try. Dive into this delicious creation and make your gatherings even more special!
PrintHalloween Lush

A refreshing and fun no-bake layered dessert perfect for Halloween parties, featuring creamy layers of cream cheese, vanilla pudding, and Cool Whip.
- Prep Time: 20 minutes
- Cook Time: 0 minutes
- Total Time: 120 minutes
- Yield: 8 servings
- Category: Dessert
- Method: No-Bake
- Cuisine: American
- Diet: Vegetarian
Ingredients
- 24 whole Oreo cookies, crushed
- ½ cup butter, melted
- 8 oz cream cheese, softened
- 1 cup powdered sugar
- 8 oz Cool Whip, thawed
- 1 package (3.4 oz) vanilla pudding mix
- 2 cups milk
- Optional food coloring
Instructions
- Crush the Oreo cookies in a food processor or plastic bag until finely crushed. In a mixing bowl, combine the crushed Oreos with melted butter. Press the mixture firmly into the bottom of a 9×13 inch serving dish to form a crust.
- Beat the softened cream cheese and powdered sugar together using an electric mixer until smooth. Gently fold in half of the Cool Whip and spread this mixture over the crust.
- Prepare the vanilla pudding according to the package instructions by whisking the pudding mix with 2 cups of milk until thick. Add food coloring if desired.
- Pour the prepared vanilla pudding over the cream cheese layer and smooth it out with a spatula.
- Spread the remaining Cool Whip over the pudding layer and decorate with sprinkles or Halloween-themed candies if desired.
- Refrigerate the dessert for at least 2 hours until fully set. Cut into squares and serve chilled.
Notes
Ensure cream cheese is softened for a smooth texture and chill time is sufficient for best results.












