
Making a fun and festive Halloween-inspired lunch is easy with creative ideas that keep things exciting for kids. This article will guide you through the process of putting together an engaging Halloween-inspired lunch using plant-based divided plates. This approach is a wonderful way to encourage healthy eating while tapping into the playful spirit of the spooky season.
Why You’ll Love Halloween Inspired Lunch
- Engaging Presentation: Divided plates allow you to arrange food in fun and imaginative ways, captivating kids’ attention and making meals more appealing.
- Balanced Nutrition: Plant-based ingredients offer essential nutrients and fiber, ensuring every bite is both tasty and healthy.
- Creative Combinations: Mixing flavors and textures helps kids explore different foods, making lunchtime a mini-adventure.
- Easy to Prepare: The recipes and ideas in this guide are simple to follow, making meal prep quick and stress-free for busy parents.
- Customizable Options: With so many possibilities for ingredients and themes, you can cater to your child’s preferences while introducing new flavors.
Recipe Overview
- Prep Time: 15 minutes
- Cook Time: 0 minutes (mostly assembly)
- Total Time: 15 minutes
- Servings: 2
- Difficulty Level: Easy
Ingredients You’ll Need for Halloween Inspired Lunch
For a delightful Halloween-inspired lunch, gather the following ingredients:
Main Ingredients:
- Plant-Based Proteins:
- Hummus (or any plant-based dip) for protein and flavor.
- Fruits and Vegetables:
- Carrot sticks (shaped into spooky fingers with a slice of almond for a fingernail).
- Cucumber slices (can be cut into ghost shapes).
- Cherry tomatoes (for "witch’s eyeballs" – use olive bits for the pupil).
- Grains:
- Whole grain crackers or bread (for mini sandwiches themed like bats or pumpkins).
Optional Add-Ins:
- Candy Eyes: For an extra spooky touch, add candy eyes to some fruit or veggie pieces.
- Plant-Based Cheese: Cut into fun shapes for additional variety and flavor.
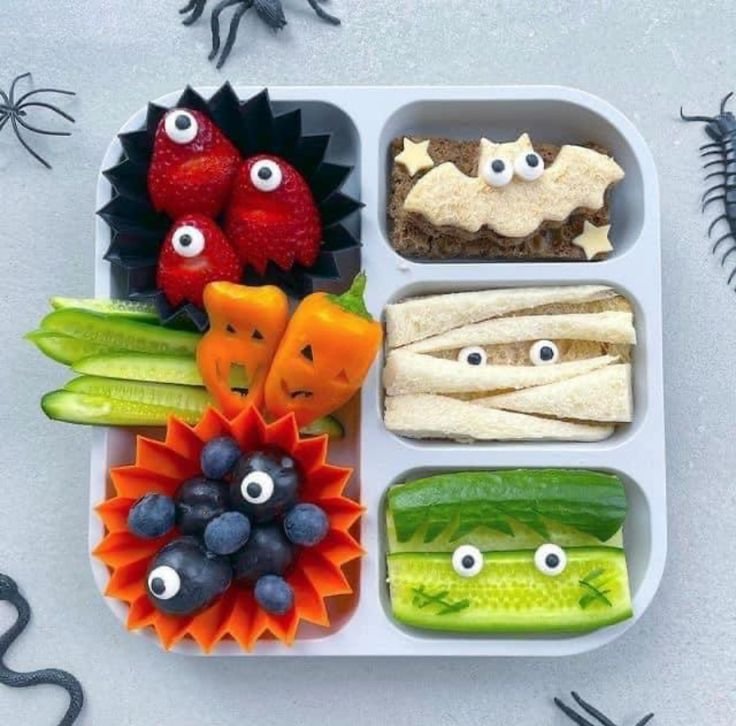
How to Make Halloween Inspired Lunch
-
Prepare Your Divided Plates
- Choose a divided plate for easy arrangement. This type of plate encourages portion control and makes it fun for kids to explore their meal.
-
Create the Spooky Carrot Fingers
- Cut the top end of cleaned carrots to a finger-like shape. Add a slice of almond to one end to mimic a fingernail. Arrange these in one section of the plate.
-
Make Ghostly Cucumber Slices
- Use a cookie cutter to form ghost shapes from cucumber slices. Alternatively, simply cut circles and dab them with plant-based cheese for "ghost" features.
-
Design Witch’s Eyeballs
- Halve cherry tomatoes and place a piece of an olive in the center for the "pupil." Position these in the plate to look eye-catching.
-
Add Fun Sandwich Shapes
- Make a sandwich with whole grain bread and cut it into bat or pumpkin shapes using cookie cutters. Fill with hummus or plant-based cheese for flavor.
-
Finish with Fresh Fruits
- Include seasonal fruits like orange slices or apple wedges for a sweet touch. Consider arranging them to resemble a Halloween scene.
Tips for Success
- Prep Ahead: Cut veggies and fruits the night before to streamline breakfast or lunch packing.
- Involve Kids: Let children help with assembling their plates, making them more likely to taste new foods.
- Mix Textures: Combine crunchy and soft ingredients for an interesting eating experience.
- Use Seasonal Shapes: Invest in seasonal cookie cutters to make lunch prep quicker and more festive.
Easy Variations
- Savory Wrap: Use a whole-grain tortilla wrapped with hummus, veggies, and plant-based cheese, sliced into pinwheels.
- Fruit Kabobs: Skewer pieces of various colored fruits and cheese shapes on sticks, adding a spooky face with edible markers.
- Sweet Monster Faces: Use rice cakes topped with nut butter and assorted fruits or seeds to create fun monster faces.
What to Serve with Halloween Inspired Lunch
- Healthy Dips: Pair with various dips like guacamole or salsa for extra flavor.
- Popcorn: Offer plain or lightly salted popcorn as a crunchy side.
- Nut Mix: A handful of mixed nuts adds protein and healthy fats to the meal.
- Infused Water: Add slices of oranges or apples to water for refreshing hydration with a hint of flavor.
Storage and Reheating
- Refrigerator Storage: Store any leftovers in an airtight container in the fridge for up to 2 days.
- Meal Prep: Pre-pack veggies and fruits in containers for quick grab-and-go lunches throughout the week.
- Avoid Moisture: Keep fruits and veggies dry to maintain texture; add a paper towel in containers to absorb excess moisture.
Common Mistakes to Avoid
- Skipping Color Variety: Different colors in food not only bring visual appeal but provide various nutrients; ensure a colorful palette.
- Not Preparing Ahead: Last-minute meal prep can lead to unhealthy choices; plan ahead to keep meals balanced.
- Ignoring Seasonality: Utilize seasonal fruits and vegetables for better flavor and cost-effectiveness.
Halloween Inspired Lunch: Background & Cultural Inspiration
Halloween has deep cultural roots, celebrating the transition between seasons. It originated from ancient Celtic festivals, where people believed that on the night before November 1st, the boundary between the living and dead blurred. This day has evolved into a time for families to come together, indulging in themed treats and festive meals. Incorporating plant-based ingredients in Halloween-themed lunches not only honors this spirit of creativity but also promotes health and sustainability.
Frequently Asked Questions
Can I make this lunch the night before?
Yes, you can prepare most of the ingredients the day before, keeping them fresh in airtight containers until lunchtime.
What if my child dislikes certain vegetables?
Substitutions are key. Consider switching out the carrot sticks for bell peppers or adding different fruits your child enjoys.
Are there gluten-free options available?
Certainly! Use gluten-free crackers or bread when creating sandwiches or snacks.
How long can I store leftovers?
Leftovers can be stored in the refrigerator for up to 2 days. Ensure they are sealed properly in airtight containers.
Can I add protein snacks?
Absolutely! Consider adding nut butter packs or plant-based protein balls for a protein boost.
Final Thoughts
Creating a Halloween-inspired lunch with plant-based divided plates is a fun and engaging way for kids to enjoy balanced meals. Not only does it celebrate the season, but it also introduces children to healthy eating practices. Try experimenting with different shapes and combinations to keep things lively, and watch your little ones delight in the playful presentation. Happy lunching!
PrintHalloween Inspired Lunch
A fun and festive Halloween-inspired lunch that encourages healthy eating with creative plant-based arrangements.
- Prep Time: 15 minutes
- Cook Time: 0 minutes
- Total Time: 15 minutes
- Yield: 2 servings
- Category: Lunch
- Method: Assembly
- Cuisine: American
- Diet: Vegetarian
Ingredients
- Hummus (or any plant-based dip)
- Carrot sticks (shaped into spooky fingers with a slice of almond for a fingernail)
- Cucumber slices (can be cut into ghost shapes)
- Cherry tomatoes (for ‘witch’s eyeballs’ – use olive bits for the pupil)
- Whole grain crackers or bread (for mini sandwiches themed like bats or pumpkins)
- Candy eyes (optional, for an extra spooky touch)
- Plant-based cheese (optional, cut into fun shapes)
Instructions
- Prepare your divided plates for easy arrangement.
- Create the spooky carrot fingers by cutting cleaned carrots into a finger-like shape and adding a slice of almond at one end.
- Make ghostly cucumber slices using cookie cutters or by cutting circles and adding cheese.
- Design witch’s eyeballs by halving cherry tomatoes and placing olives in the center.
- Add fun sandwich shapes using cookie cutters on whole grain bread filled with hummus or plant-based cheese.
- Finish with seasonal fruits like orange slices or apple wedges.
Notes
Prep ahead by cutting veggies and fruits the night before for easier assembly. Involve kids in the process to encourage them to try new foods.












