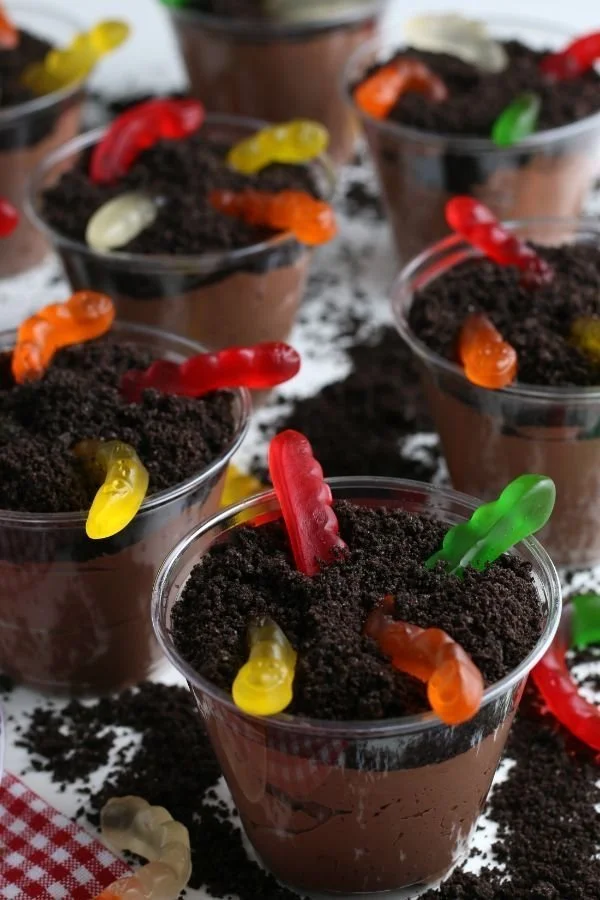
Halloween Dirt Pudding Cups with Gummy Worms offer a fun and whimsical dessert that captures the spirit of Halloween. These delightful treats not only look inviting but are also easy to make, creating a perfect activity to enjoy with family or friends. With layers of chocolate pudding, crushed cookies, and gummy worms, this recipe is sure to please children and adults alike.
Why You’ll Love Halloween Dirt Pudding Cups with Gummy Worms
- Fun for All Ages: These pudding cups are not just a treat; they are a playful dessert that can bring out the child in everyone, making them perfect for parties or family gatherings.
- Quick and Easy: With minimal ingredients and steps, you can whip these up in no time. They’re a great last-minute dessert option.
- Customizable: Change up the toppings or flavors to suit your preferences, allowing you to personalize each cup.
- No Baking Required: This recipe skips the oven, making it a hassle-free option that you can assemble in just a few minutes.
- Perfect for Themed Events: They fit right into Halloween festivities but can also be adapted for birthday parties, movie nights, or picnic treats.
Recipe Overview
- Prep Time: 15 minutes
- Chill Time: 1 hour
- Total Time: 1 hour 15 minutes
- Servings: 4
- Difficulty Level: Easy
Ingredients You’ll Need for Halloween Dirt Pudding Cups with Gummy Worms
- Chocolate Pudding Mix (1 box, typically 3.9 oz): This forms the rich and creamy base.
- Milk (2 cups): Use whole milk for a richer taste, but any milk will work as a substitute.
- Oreos (1 cup, crushed): Adds a crunchy texture that mimics dirt. You can also use chocolate sandwich cookies for a similar effect.
- Gummy Worms (1 cup): The fun candy top that adds whimsy to your dessert. Feel free to mix in other gummy candies for variety.
- Whipped Topping (optional, for garnish): Adds a fluffy element to the cups and can be homemade or store-bought.
How to Make Halloween Dirt Pudding Cups with Gummy Worms
-
Make the Pudding:
In a mixing bowl, whisk together the chocolate pudding mix and milk until well combined. This should take about 2–3 minutes. Let it sit for about 5 minutes to thicken. -
Crush the Cookies:
Place the Oreos in a plastic bag and crush them using a rolling pin or your hands until they resemble coarse crumbs. Set aside. -
Layer the Cups:
In clear cups or bowls, layer the pudding at the bottom, filling each cup about a third of the way full. -
Add Cookie Crumbs:
Sprinkle a layer of the crushed Oreos over the pudding in each cup, creating the “dirt” layer. -
Repeat Layers:
Add another layer of pudding on top of the Oreos and then a second layer of cookie crumbs. -
Top with Gummy Worms:
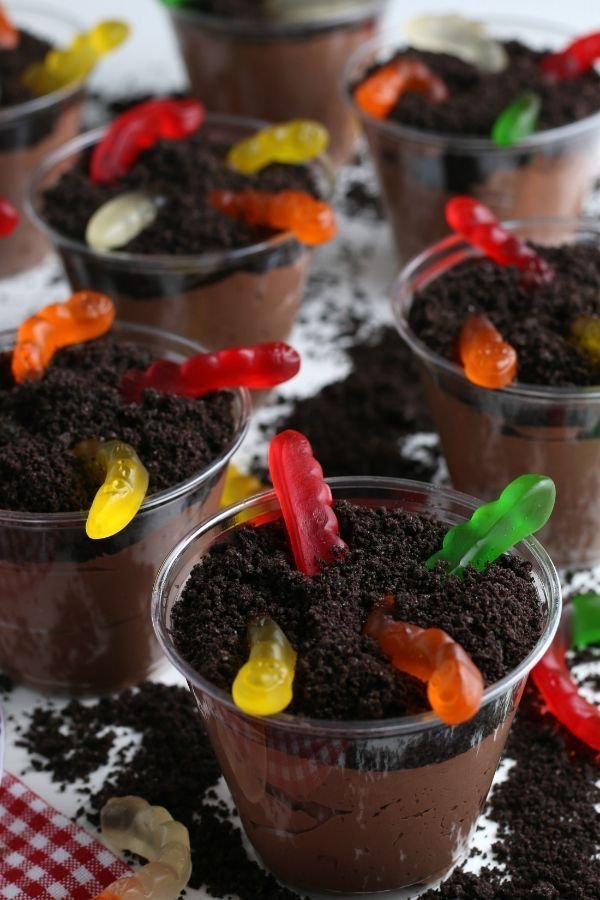
Finish each cup by placing gummy worms on the top layer of cookie crumbs, letting some dangle over the sides for a playful touch. -
Chill and Serve:
Place the cups in the refrigerator for about 1 hour to set. Serve chilled and enjoy your Halloween treat!
Tips for Success
- Pudding Tips: Ensure that you follow the package instructions closely for the best texture. It should be thick but smooth without any lumps.
- Cookie Crumble Size: Don’t crush the Oreos too finely; a few larger pieces can add a nice texture contrast.
- Gummy Worms: Consider using a variety of colored gummy candies for a more festive look.
- Chill Time: Allowing the assembled cups to chill helps the flavors meld together and improves the overall experience.
- Serving Size: Adjust the recipe to make more servings by using larger cups or by making multiple batches.
Easy Variations
- Vanilla Pudding Base: Swap the chocolate pudding for vanilla or even butterscotch for a different flavor profile.
- Nutty Layer: Add a layer of crushed nuts or granola for added crunch and flavor.
- Fruit Addition: Mix in some crushed strawberries or raspberries with the pudding for a fruity twist.
- Candy Mix: Instead of gummy worms, try topping with Halloween-themed candies like chocolate eyeballs or pumpkin candies.
- Dairy-Free Option: Substitute dairy milk with almond milk and use vegan whipped topping.
What to Serve with Halloween Dirt Pudding Cups with Gummy Worms
- Spider Web Brownies: Rich and fudgy brownies create a nice contrast with the light pudding cups.
- Pumpkin Spice Cookies: Their fall flavors make for a seasonal dessert partner that many will love.
- Fruit Salad: Offering a healthy side gives balance to the dessert table.
- Candy Corn Cupcakes: These add festive color and complement the Halloween theme perfectly.
- Popcorn Mix: A sweet and salty popcorn mix can serve as a snack alongside the pudding cups.
Storage and Reheating
- Refrigerator Storage: Store in the refrigerator in an airtight container for up to 3 days. Keep the gummy worms separate until ready to serve to maintain their texture.
- Freezer Storage: Freezing this dessert is not recommended as it can alter the textures of the pudding and whipped topping.
- Reheating Tips: Since this is a chilled dessert, it does not require reheating. Simply remove from the refrigerator just before serving.
- Meal Prep Note: You can prepare these cups a day in advance, making them great for party planning.
Common Mistakes to Avoid
- Not Whisking Enough: Ensure the pudding is thoroughly mixed for a smooth texture.
- Over Crushing Oreos: Crushed too finely, they may lose their appealing texture in the layers.
- Skipping Chill Time: This can impact the flavor blend and texture, so be sure to allow for the recommended chill.
- Too Much Gummy Candy: While they are fun, too many toppings can overpower the dessert.
- Ignoring Layering Technique: Proper layering helps maintain the visual appeal of the process.
Halloween Dirt Pudding Cups with Gummy Worms: Background & Cultural Inspiration
Halloween Dirt Pudding Cups reflect the playful spirit of Halloween festivities. Originally inspired by the concept of graveyard desserts, they have evolved to bring together the fun of Halloween treats with themes of nature and a childlike imagination. These cups encourage creative expression in food preparation, often enjoyed by parents and children as they prepare for the spooky season. The layers symbolize the beauty of dirt and the wonder of nature, making it a perfect treat to celebrate Halloween’s whimsical and fun aspects.
Frequently Asked Questions
Can I make this recipe in advance?
Yes, you can prepare the pudding cups a day ahead of time, but keep the gummy worms separate until serving to maintain their texture.
What can I substitute for the chocolate pudding mix?
You can use vanilla pudding mix or any other flavor you prefer. However, the chocolate flavor provides the most authentic “dirt” experience.
How do I store leftovers?
Keep any leftovers in an airtight container in the refrigerator for up to 3 days.
Can I use homemade pudding?
Absolutely! Just follow the same layering instructions once your homemade pudding has set.
What is the best way to crush Oreos?
You can use a rolling pin in a plastic bag, a food processor, or simply crush them with your hands for a more rustic look.
Final Thoughts
Halloween Dirt Pudding Cups with Gummy Worms are not just delightful to look at but also incredibly quick and easy to make. They bring joy and playfulness to any gathering, making them a perfect addition to your Halloween festivities or any fun occasion. The combination of creamy pudding and crunchy cookies keeps every bite satisfying, inviting you to enjoy more. So gather your ingredients and create some delicious memories with this fun recipe!
PrintHalloween Dirt Pudding Cups with Gummy Worms

A fun and whimsical dessert featuring layers of chocolate pudding, crushed cookies, and gummy worms, perfect for Halloween festivities.
- Prep Time: 15 minutes
- Cook Time: 0 minutes
- Total Time: 75 minutes
- Yield: 4 servings
- Category: Dessert
- Method: No Bake
- Cuisine: American
- Diet: Vegetarian
Ingredients
- 1 box Chocolate Pudding Mix (typically 3.9 oz)
- 2 cups Milk
- 1 cup Oreos, crushed
- 1 cup Gummy Worms
- Whipped Topping (optional, for garnish)
Instructions
- Whisk together the chocolate pudding mix and milk until combined. Let it sit for about 5 minutes to thicken.
- Crush the Oreos in a plastic bag until they resemble coarse crumbs.
- Layer the pudding at the bottom of clear cups or bowls, filling each about a third of the way full.
- Sprinkle a layer of crushed Oreos over the pudding in each cup.
- Add another layer of pudding on top of the Oreos and then a second layer of cookie crumbs.
- Top each cup with gummy worms, letting some dangle over the sides.
- Chill the cups in the refrigerator for about 60 minutes before serving.
Notes
For best texture, follow pudding package instructions closely. Allowing the cups to chill helps flavors meld.












