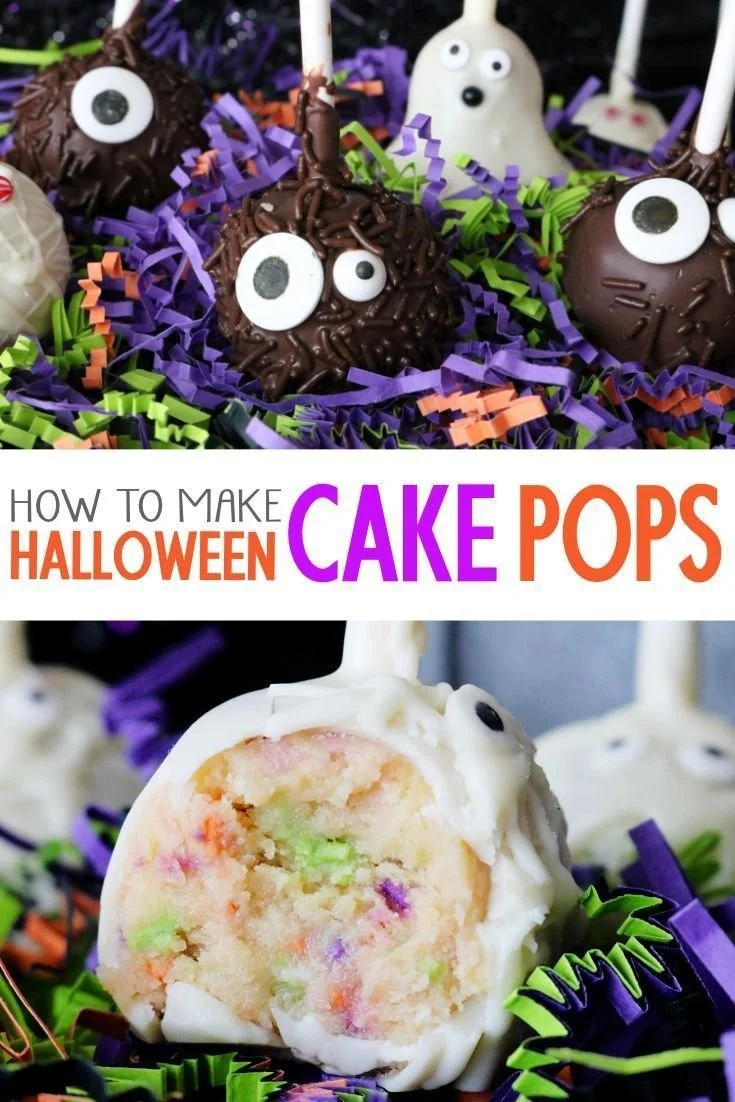
Halloween Cake Pops are a delightful and fun treat that captures the spirit of the spooky season. These cake pops are not only simple to make but also allow for plenty of creativity in decoration. Perfect for parties or as a festive snack for kids and adults alike, these treats will surely bring smiles all around. Let’s dive into why these cake pops are a must-try!
Why You’ll Love Halloween Cake Pops
- Simple to Make: With just six ingredients and straightforward steps, even novice bakers can whip these up with ease.
- Customizable Decorations: Use candy melts, sprinkles, and other fun toppings to create uniquely decorated cake pops that suit your style or theme.
- Family-Friendly Activity: Making cake pops is a wonderful opportunity to involve kids in the kitchen. Decorating them can be a fun bonding experience!
- Perfect for Any Gathering: Whether it’s a Halloween party, school function, or just a cozy night in, these cake pops are a hit.
- Great for Leftover Cake: Have leftover cake? This recipe cleverly transforms it into something new and exciting, minimizing food waste.
Recipe Overview
- Prep Time: 20 minutes
- Cook Time: 30 minutes
- Total Time: 50 minutes
- Servings: About 20 cake pops
- Difficulty Level: Easy
Ingredients You’ll Need for Halloween Cake Pops
- For the Cake Mixture:
- 1 box chocolate cake mix
- 3 eggs
- 1 cup water
- 1/2 cup vegetable oil
- For the Decoration:
- 1 cup frosting (store-bought or homemade)
- Candy melts (various colors; choose your Halloween favorites)
- Sprinkles or other decorations (e.g., edible eyes, Halloween-themed decorations)
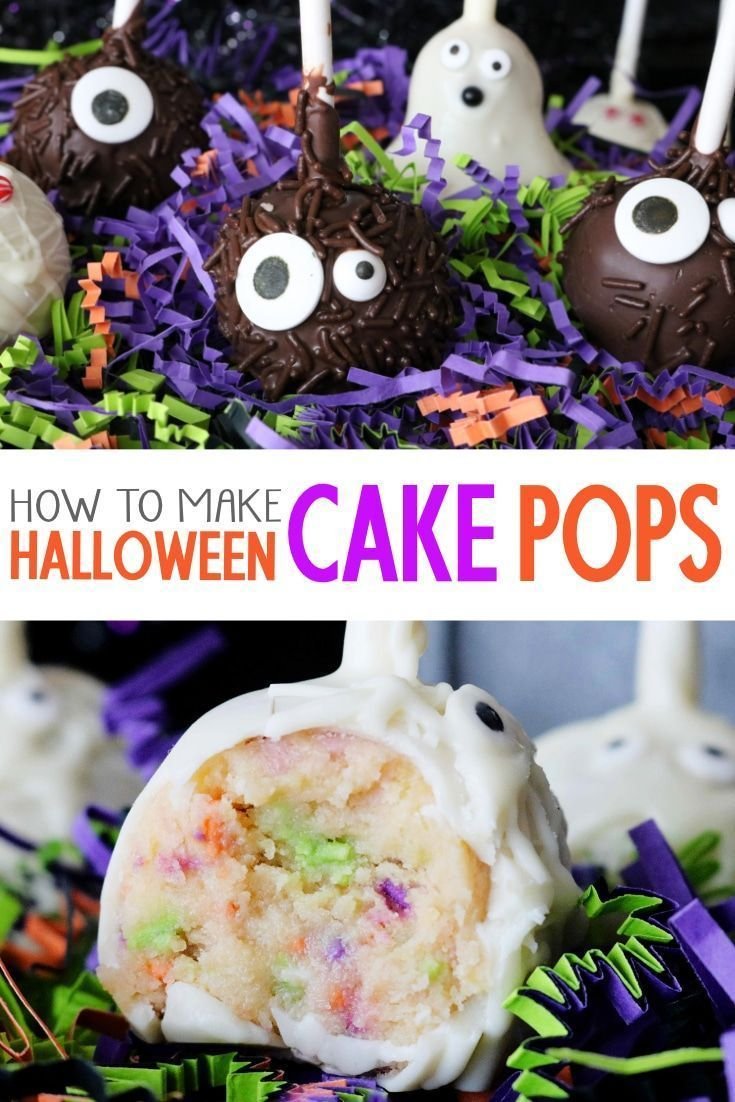
How to Make Halloween Cake Pops
-
Bake the Cake: Preheat the oven and prepare the chocolate cake mix according to the package instructions. Pour the batter into a greased cake pan and bake until a toothpick comes out clean. Let the cake cool completely in the pan on a wire rack.
-
Crumble the Cake: Once the cake is entirely cool, crumble it into a large bowl. Be sure to create fine crumbs for a smooth texture.
-
Mix with Frosting: Add the frosting to the crumbled cake. Stir until fully combined; the mixture should be moist but firm enough to hold its shape when rolled.
-
Form Cake Balls: Use your hands to roll the mixture into small balls, about 1 inch in diameter. Place them onto a baking sheet lined with parchment paper. Freeze the cake balls for about 30 minutes, until they are set.
-
Prepare the Lollipop Sticks: Melt the candy melts according to the package directions. Dip the tip of each lollipop stick into the melted candy and insert it into the center of each cake ball. This helps hold the stick in place.
-
Coat the Cake Pops: Dip each cake pop into the melted candy melts. Tap off any excess coating and decorate with sprinkles or other fun decorations while the candy is still wet.
-
Set and Serve: Place the decorated cake pops upright in a stand or styrofoam block to set completely. Once the candy coating hardens, your spooky treats are ready to enjoy!
Tips for Success
- Ensure the cake is thoroughly cooled before crumbling; warm cake can lead to a gooey mixture.
- If using homemade frosting, allow it to cool and firm up slightly for better mixture consistency.
- Create a melting “bath” by using a deep bowl for the candy melts; it allows for easier dipping and a smoother coat.
- Feel free to experiment with different candy melt colors for unique effects!
Easy Variations
- Red Velvet Cake Pops: Swap the chocolate cake mix for red velvet for a festive twist.
- Nutty Touch: Add chopped nuts or crushed pretzels to the cake mixture for added texture.
- Candy Corn Theme: Use yellow and orange candy melts for a fun candy corn look.
- Filling Surprise: Add a dollop of peanut butter or jam in the center of the cake ball before coating.
- Dairy-Free Option: Use a dairy-free cake mix and frosting, as well as dairy-free candy melts for a vegan-friendly version.
What to Serve with Halloween Cake Pops
- Hot Chocolate: A warm, chocolatey drink complements the sweetness of the cake pops perfectly.
- Fruit Platter: Fresh fruits provide a refreshing contrast to the sweetness and can offer a lighter option.
- Spooky Themed Punch: Serve with a themed drink for festive flair—try adding dry ice for a foggy effect.
- Halloween Cookies: A platter of themed cookies makes for a perfect party spread alongside the cake pops.
- Cheese Board: Add savory bites for a balanced selection that satisfies different tastes.
Storage and Reheating
- Refrigerator Storage: Store cake pops in an airtight container in the fridge for up to a week.
- Freezer Storage: For longer-term storage, freeze undecorated cake pops in a single layer until solid, then transfer to a freezer bag. They can last up to 3 months in the freezer.
- Reheating: There’s no need to reheat, but if you do wish to soften, let them sit at room temperature for about 20 minutes.
Common Mistakes to Avoid
- Overbaking the Cake: Keep an eye on the baking time to ensure the cake remains moist; dry cake will lead to dry cake pops.
- Mixing Too Little/Fully: Ensure the frosting and cake crumbs are thoroughly combined for a good texture, but don’t overmix as it can become too dense.
- Insufficient Cooling: Skipping the cooling step can lead to melted decorations and unformed cake pops.
- Too Much Frosting: Adjust the amount based on the consistency; too much can make the mixture overly soggy.
Halloween Cake Pops: Background & Cultural Inspiration
Cake pops have become a popular modern treat, especially for celebrations. They originated in the United States and have grown in popularity thanks to their versatility and fun presentation. Halloween, with its themes of creativity and imagination, is a perfect fit for these pastry delights. Incorporating festive colors and decorations, cake pops symbolize the joy of the season and are often shared at parties, school events, and friendly gatherings.
Frequently Asked Questions
How can I make my cake pops look more festive?
Use various colored sprinkles, or edible decorations like candy eyes or themed cupcake liners to add flair.
Can I make these ahead of time?
Yes! You can make the cake pops a day or two in advance. Just keep them refrigerated until you’re ready to serve.
What are the best chocolate cake mix brands for this recipe?
Brands like Duncan Hines or Betty Crocker are popular choices, as they offer rich flavors and reliable results.
How do I store leftover cake pops?
Place uneaten cake pops in an airtight container and store them in the fridge. They should last about a week.
Can I substitute the eggs in the cake mix?
Yes, you can use a ¼ cup of applesauce or a flax egg (1 tablespoon ground flaxseed mixed with 2.5 tablespoons water) for each egg.
Final Thoughts
Halloween Cake Pops are not only a fun and engaging treat to make, but they also allow for endless creativity with decorating. Perfect for parties or as an activity for kids, these cake pops are bound to be a hit. The simple ingredients and steps make them easily achievable, allowing you to bring a touch of spookiness to your celebrations. So gather your supplies and enjoy crafting these delightful treats!
PrintHalloween Cake Pops

Delightful and fun cake pops perfect for Halloween parties, made with chocolate cake and customizable decorations.
- Prep Time: 20 minutes
- Cook Time: 30 minutes
- Total Time: 50 minutes
- Yield: 20 cake pops
- Category: Dessert
- Method: Baking
- Cuisine: American
- Diet: Vegetarian
Ingredients
- 1 box chocolate cake mix
- 3 eggs
- 1 cup water
- 1/2 cup vegetable oil
- 1 cup frosting (store-bought or homemade)
- Candy melts (various colors)
- Sprinkles or other decorations (e.g., edible eyes, Halloween-themed decorations)
Instructions
- Preheat the oven and prepare the chocolate cake mix according to the package instructions. Pour the batter into a greased cake pan and bake until a toothpick comes out clean. Let the cake cool completely in the pan on a wire rack.
- Crumble the cake into a large bowl once completely cool, creating fine crumbs for a smooth texture.
- Add the frosting to the crumbled cake and stir until fully combined; the mixture should be moist but firm enough to hold its shape when rolled.
- Roll the mixture into small balls, about 1 inch in diameter. Place them onto a baking sheet lined with parchment paper. Freeze the cake balls for about 30 minutes, until they are set.
- Melt the candy melts according to the package directions. Dip the tip of each lollipop stick into the melted candy and insert it into the center of each cake ball.
- Dip each cake pop into the melted candy melts. Tap off any excess coating and decorate with sprinkles or other fun decorations while the candy is still wet.
- Place the decorated cake pops upright in a stand or styrofoam block to set completely. Once the candy coating hardens, your spooky treats are ready to enjoy!
Notes
Ensure the cake is thoroughly cooled before crumbling. Experiment with different candy melt colors for unique effects.












