
The Easy Tissue Paper Pumpkin Goody Bags are delightful Halloween school treats that can be whipped up in no time. This simple recipe offers a fun and engaging way to celebrate the spooky season, making it perfect for both kids and adults. Not only are these goody bags easy to make, but they can also be customized to fit your unique Halloween theme.
Why You’ll Love Easy Tissue Paper Pumpkin Goody Bags
- Quick and Fun: These goody bags come together in a matter of minutes, perfect for last-minute festivities.
- Customizable: You can fill them with a variety of treats or small toys to cater to any group, whether it’s for school or a Halloween party.
- Interactive Craft: Kids love getting involved in the creation process, making this a perfect project for a family craft night.
- Minimal Supplies Required: With just a few basic materials, you can create an eye-catching decoration that adds to the Halloween spirit.
- Eco-Friendly Option: By using tissue paper and recycled items, you can create festive decorations without contributing to waste.
Recipe Overview
- Prep Time: 15 minutes
- Cook Time: 0 minutes
- Total Time: 15 minutes
- Servings: Makes 10 goody bags
- Difficulty Level: Easy
Ingredients You’ll Need for Easy Tissue Paper Pumpkin Goody Bags
- Orange Tissue Paper: This will be the main material for your pumpkin bags. Consider getting various shades for a fun effect.
- Green Ribbon or Twine: Used to tie the top of the bags and create the pumpkin stem.
- Scissors: For cutting the tissue paper and ribbon to your desired lengths.
- Fillings: Choose treats such as candy, stickers, or small toys to put inside the bags.

How to Make Easy Tissue Paper Pumpkin Goody Bags
-
Cut Tissue Paper:
- Cut ten sheets of orange tissue paper into rectangles, about 12 inches by 16 inches. You can adjust the size based on how large you want your pumpkins to be.
-
Stack the Paper:
- Layer two or three pieces of the cut sheets on top of each other. This will give the goody bags more structure.
-
Add the Fillings:
- Place your chosen treats in the center of the layered tissue paper stacks. Don’t overfill; you want them to close easily.
-
Gather and Twist:
- Starting from the bottom, gather the tissue paper up towards the center, twisting gently to secure the filling inside.
-
Secure with Ribbon:
- Take your green ribbon or twine and tie it around the twisted part to create the pumpkin’s stem. You can make a bow if you’d like for a decorative touch.
-
Shape the Pumpkin:
- Gently fluff out the tissue paper around the ribbon. You can use your fingers to shape it like a pumpkin for a more authentic look.
Tips for Success
- Choose the Right Size: When cutting tissue paper, make sure your rectangles are large enough to hold the treats but can still be gathered easily.
- Mix Colors: Use different shades of orange or even combine colors to create a unique look.
- Use Lightweight Fillings: Opt for light candies or small toys that won’t weigh down the tissue paper too much.
- Practice Twisting: Get a feel for how tight you need to twist the tissue to create a secure pumpkin shape—too tight may rip the paper.
- Decorate: Consider adding faces or decorations to the outside of your bags with markers for a fun twist.
Easy Variations
- Themed Fillings: For a pirate-themed party, use chocolate coins instead of standard candy.
- Glitter Pumpkins: Add some glitter to your orange tissue paper before you gather it to give a sparkling effect.
- Halloween Colors: Instead of orange, try creating ghostly white bags with black ribbons for a spooky effect.
- Mini Versions: Make smaller versions using smaller rectangles, perfect for class parties.
What to Serve with Easy Tissue Paper Pumpkin Goody Bags
- Hot Apple Cider: Perfect for a chilly Halloween night, this drink complements the sweet treats inside.
- Halloween Cupcakes: Serve some fun cupcakes with festive frosting for a complete Halloween treat spread.
- Pumpkin Spice Cookies: These cookies pair well with your goody bags and offer a seasonal flavor.
- Caramel Apples: A classic fall dessert that adds a nice touch to your Halloween celebration.
Storage and Reheating
- Refrigerator Storage: If you plan to make the goody bags ahead of time, store them in a cool, dry place, ideally at room temperature, to prevent the treats from melting or becoming soggy.
- Freezer Storage: Not recommended since the tissue paper can become damaged when frozen.
- Reheating Method: Not applicable, as these bags are not meant for reheating.
- Meal Prep Note: You can prepare the bags a couple of days in advance; just be sure to store them in a way that keeps them cushioned and uncrushed.
Common Mistakes to Avoid
- Overfilling: Trying to pack too much candy can result in bags that won’t close properly. A little filling goes a long way.
- Using Heavy Materials: Avoid adding heavy items as fillings. Stick to light snacks and toys.
- Ignoring Size of Cuts: Make sure your tissue paper is the right size; too small won’t gather up nicely, and too large can be unwieldy.
- Not Securing the Twist: Failing to twist tightly enough may result in spills; ensure it’s gathered snugly to keep the goodies inside.
Easy Tissue Paper Pumpkin Goody Bags: Background & Cultural Inspiration
Halloween is celebrated in many cultures, often as a harvest festival and a time to remember the deceased. The tradition of “guising” with treat bags originated in Ireland, where children dressed up and went from house to house for cakes and sweets. The pumpkin, particularly the jack-o’-lantern, symbolizes the season. These easy tissue paper pumpkin bags carry forward the festive spirit while being child-friendly and enjoyable to make as a family activity.
Frequently Asked Questions
Can I use different colors of tissue paper?
Absolutely! Feel free to use any colors you like; different shades can create unique pumpkin looks.
How long can I store the goody bags?
These are best enjoyed within a week of making them; just keep them in a cool place to maintain freshness.
What types of treats work best for filling?
Light candies, stickers, and small toys are great fill options. Avoid anything too heavy or perishable.
Can I decorate the goody bags?
Yes! Personalize each bag with stickers, faces, or drawings to make them special.
Are these bags safe for young children?
As long as the fillings are age-appropriate (avoiding choking hazards), they are safe and fun for children!
Final Thoughts
The Easy Tissue Paper Pumpkin Goody Bags are an excellent way to get into the Halloween spirit while creating something both practical and festive. They provide joy not only to those who make them but also to those who receive them. This quick and fun crafting activity is perfect for engaging kids and making memories together. Give these goody bags a try—they’re sure to be a hit at any Halloween gathering!
PrintEasy Tissue Paper Pumpkin Goody Bags
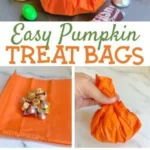
Delightful Halloween goody bags made with orange tissue paper, perfect for kids and adults.
- Prep Time: 15 minutes
- Cook Time: 0 minutes
- Total Time: 15 minutes
- Yield: 10 goody bags
- Category: Dessert
- Method: Crafting
- Cuisine: American
- Diet: Vegetarian
Ingredients
- Orange Tissue Paper: 10 sheets, cut into rectangles (12 inches by 16 inches)
- Green Ribbon or Twine: for tying the bags
- Scissors: for cutting tissue paper and ribbon
- Fillings: such as candy, stickers, or small toys
Instructions
- Cut ten sheets of orange tissue paper into rectangles, about 12 inches by 16 inches.
- Stack two or three pieces on top of each other to give structure.
- Add your chosen treats in the center of the layered tissue paper stacks.
- Gather the tissue paper starting from the bottom and twist to secure the filling.
- Secure with green ribbon or twine around the twisted part to create the pumpkin’s stem.
- Shape the pumpkin by fluffing out the tissue paper around the ribbon.
Notes
Use lightweight fillings to prevent the bags from tearing. Consider customizing with colors and decorations.












