
Making Halloween Brownies is a delightful way to celebrate the spooky season with a treat that’s both easy and delicious. These rich, chocolatey brownies can be easily transformed into creepy creations perfect for festive gatherings. With simple ingredients and fun decorations, you’ll bring smiles to everyone who takes a bite.
Why You’ll Love Halloween Brownies
- Easy to Make: With straightforward steps and minimal equipment, even beginner cooks will shine with this recipe.
- Customizable Decorations: Use candy eyes, gummy worms, or chocolate legs to create various spooky designs, making them fun for kids and adults alike.
- Rich Chocolate Flavor: The combination of cocoa powder and melted butter delivers a decadent brownie with an irresistible taste.
- Perfect for Celebrations: Whether for a Halloween party or as a festive family treat, these brownies set the mood perfectly.
- Quick Baking Time: They bake in just 20-25 minutes, allowing more time for celebrating with friends and family.
Recipe Overview
- Prep Time: 15 minutes
- Cook Time: 20-25 minutes
- Total Time: 35-40 minutes
- Servings: 12-16 brownies
- Difficulty Level: Easy
Ingredients You’ll Need for Halloween Brownies
- Brownie Base:
- 1 cup unsweetened cocoa powder
- 1 cup all-purpose flour
- 2 cups sugar
- 1 cup melted butter
- 4 large eggs
- 1 teaspoon vanilla extract
- 1/2 teaspoon salt
- Decorations:
- Candy eyes
- Gummy worms
- Chocolate legs (for a Halloween theme)

How to Make Halloween Brownies
-
Preheat the Oven
Preheat your oven to 350°F (175°C) and grease a sheet pan to prevent sticking. -
Mix Butter and Sugar
In a large bowl, combine the melted butter and sugar. Mix until well combined and glossy. -
Add Eggs and Vanilla
Add the eggs to the butter-sugar mixture, one at a time, mixing well after each addition. Stir in the vanilla extract. -
Combine Dry Ingredients
In a separate bowl, whisk together the cocoa powder, flour, and salt to ensure even distribution. -
Mix Wet and Dry Ingredients
Gradually add the dry mixture to the wet ingredients, stirring until just combined. Avoid over-mixing for a fudgy texture. -
Prepare to Bake
Pour the brownie batter into your prepared sheet pan and spread it evenly. -
Bake the Brownies
Bake in the preheated oven for 20-25 minutes or until a toothpick inserted into the center comes out clean. -
Decorate Once Cooled
Let the brownies cool completely in the pan, then decorate with candy eyes, gummy worms, and chocolate legs to create your spooky Halloween design.
Tips for Success
- Do Not Overmix: Mixing too much can lead to cakey brownies. Stir just until the ingredients are combined.
- Check Doneness: Start checking for doneness at 20 minutes. Ovens can vary, and you want them fudgy, not dry.
- Cool Before Decorating: Allow the brownies to cool first; decorating them while warm may cause the toppings to melt.
- Use Fresh Ingredients: Make sure your cocoa powder and other ingredients are fresh for the best flavor.
- Watch the Oven Temperature: Ovens can differ in temperature accuracy; a thermometer can help ensure your brownies bake perfectly.
Easy Variations
- Nutty Brownies: Add 1 cup of chopped nuts, such as walnuts or pecans, for added texture and flavor.
- Minty Twist: Mix in 1 teaspoon of peppermint extract for a refreshing variation.
- Swirled Cheesecake: For a twist, swirl in some cream cheese mixed with sugar and an egg to the brownie batter before baking for a marbled effect.
- Gluten-Free Option: Substitute all-purpose flour with almond flour or a gluten-free flour blend.
- Fruity Additions: Top with fresh raspberries or dollops of peanut butter before baking for a unique flavor twist.
What to Serve with Halloween Brownies
- Pumpkin Spice Latte: The warm, spicy notes contrast beautifully with the rich chocolate.
- Vanilla Ice Cream: Serves as a perfect cooling counterpart to the brownies and balances the sweetness.
- Hot Chocolate: For true chocolate lovers, this makes a comforting and indulgent pairing.
- Spooky Fruit Punch: A colorful fruit punch can add a festive flair to your dessert presentation.
- Trail Mix: A crunchy, salty trail mix can create a nice balance with the sweet brownies.
Storage and Reheating
- Refrigerator Storage: Store brownies in an airtight container in the fridge for up to a week.
- Freezer Storage: You can freeze brownies for up to three months. Wrap them tightly in plastic wrap and place in a freezer bag.
- Best Reheating Method: Reheat in a microwave for about 10-15 seconds to warm them without drying out.
- Preserving Texture: To maintain their fudgy texture, ensure they cool completely before storing, and reheat gently.
Common Mistakes to Avoid
- Skipping the Cooling Step: Decorating warm brownies can lead to a melted mess.
- Not Measuring Accurately: Ensure you measure ingredients correctly. Use a kitchen scale for best results.
- Using Old Ingredients: Dated cocoa powder or flour can compromise the flavor and texture of your brownies.
- Overbaking: Keep an eye on your brownies—overbaked brownies can become dry and crumbly.
- Ignoring Oven Preheating: Always preheat your oven to ensure even baking.
Halloween Brownies: Background & Cultural Inspiration
Halloween candies and decorations have evolved from ancient traditions of honoring the harvest season to a modern celebration filled with sweets and spooky motifs. These brownies capture the spirit of creativity that Halloween inspires. The rich chocolate base symbolizes the autumn harvest, while the playful decorations mirror the festive spirit of the holiday.
Frequently Asked Questions
Can I use dark chocolate instead of cocoa powder?
Yes, you can melt dark chocolate and replace the cocoa powder and butter with it. Adjust the sugar to taste, as dark chocolate can be less sweet.
How long can I store the brownies in the fridge?
You can keep brownies in the refrigerator in an airtight container for up to a week, making them perfect for post-Halloween treats.
Can you make these brownies ahead of time?
Absolutely! They can be made a day or two in advance and stored in the refrigerator until ready to serve.
What should I do if my brownies are too dry?
If they turn out dry, try adding a scoop of whipped cream or even a sprinkle of milk over the top before serving to help revive their fudginess.
Can I skip the toppings?
Yes, the brownies are delicious on their own! Feel free to enjoy them plain or with a dusting of powdered sugar if you prefer a simpler dessert.
Final Thoughts
Halloween Brownies offer a fun and delicious way to embrace the Halloween spirit with creativity and ease. Whether you’re hosting a party or just enjoying a cozy evening at home, these brownies are sure to delight everyone. Try making them this Halloween season, and watch them disappear!
PrintHalloween Brownies
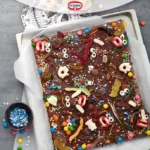
Easy and delicious brownies decorated for Halloween, perfect for festive gatherings.
- Prep Time: 15
- Cook Time: 25
- Total Time: 40
- Yield: 12-16 brownies
- Category: Dessert
- Method: Baking
- Cuisine: American
- Diet: Vegetarian
Ingredients
- 1 cup unsweetened cocoa powder
- 1 cup all-purpose flour
- 2 cups sugar
- 1 cup melted butter
- 4 large eggs
- 1 teaspoon vanilla extract
- 1/2 teaspoon salt
- Candy eyes (for decoration)
- Gummy worms (for decoration)
- Chocolate legs (for decoration)
Instructions
- Preheat your oven to 350°F (175°C) and grease a sheet pan to prevent sticking.
- Mix the melted butter and sugar in a large bowl until well combined and glossy.
- Add the eggs to the butter-sugar mixture, one at a time, mixing well after each addition and stirring in the vanilla extract.
- Combine cocoa powder, flour, and salt in a separate bowl to ensure even distribution.
- Mix the dry mixture into the wet ingredients, stirring until just combined.
- Prepare to pour the brownie batter into your prepared sheet pan and spread it evenly.
- Bake in the preheated oven for 20-25 minutes or until a toothpick inserted comes out clean.
- Decorate the cooled brownies with candy eyes, gummy worms, and chocolate legs to create your spooky design.
Notes
Do not overmix; check doneness at 20 minutes. Cool before decorating to prevent toppings from melting.












