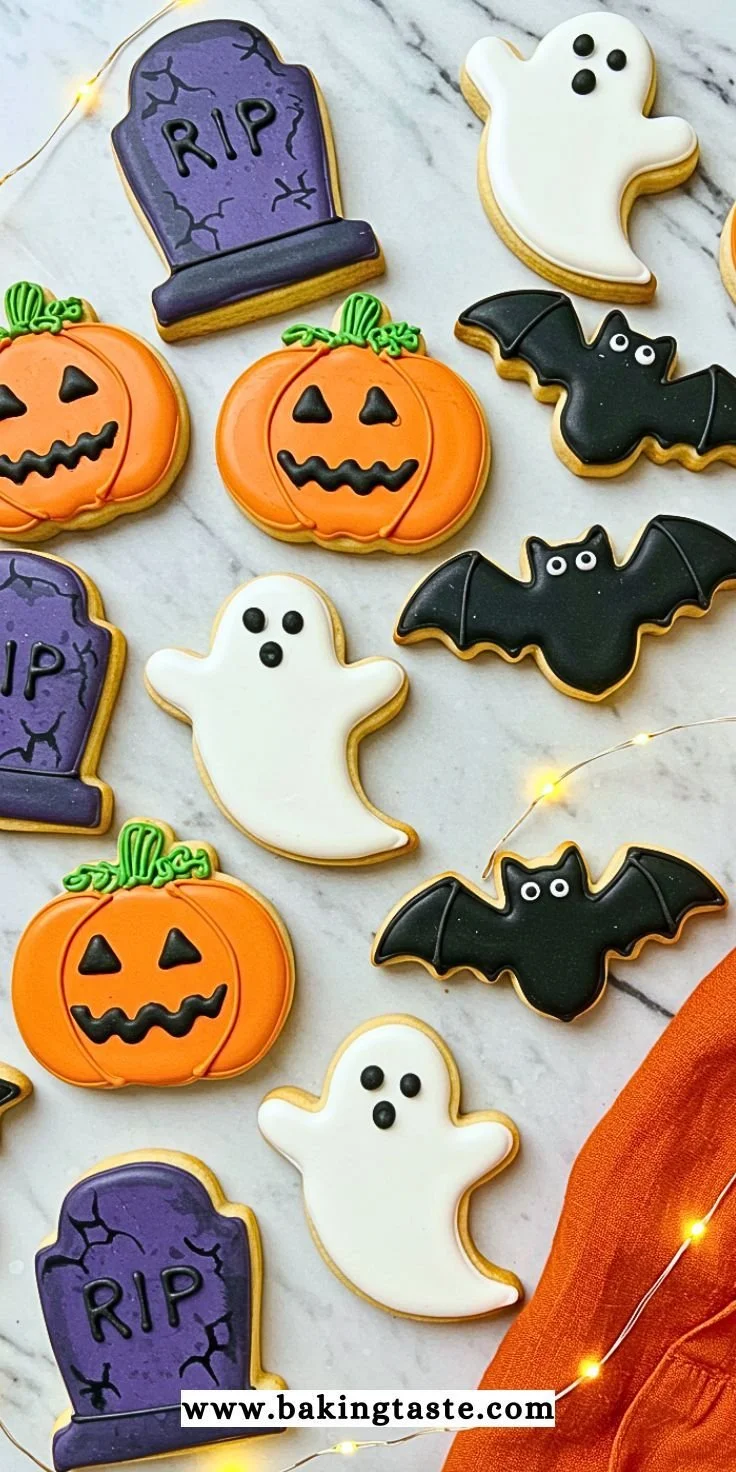
Halloween Sugar Cookies are not just delightful treats; they are a fun and creative way to celebrate the spooky season. Soft, buttery, and easy to decorate, these cookies come together quickly and are perfect for parties or family gatherings. With their vibrant colors and playful shapes, they are sure to bring smiles to both kids and adults alike.
Why You’ll Love Halloween Sugar Cookies
- Easy to Make: Whether you’re a seasoned baker or a kitchen novice, this recipe is straightforward and uses common ingredients.
- Customizable: Get creative with your icing colors and cookie shapes! From ghosts to pumpkins, the options are endless.
- Perfect for Sharing: Bake a batch and share them with friends, family, or neighbors—ideal for Halloween parties or school events.
- Soft and Delicious: With the right balance of ingredients, these cookies are tender and melt in your mouth.
- Fun for Kids and Adults: Decorating these cookies is a fun activity for the whole family, making it both a delicious dessert and an enjoyable craft project.
- Make-Ahead Option: You can prepare the dough in advance, making it convenient for busy schedules leading up to Halloween.
Recipe Overview
- Prep Time: 30 minutes
- Cook Time: 10 minutes
- Total Time: 40 minutes
- Servings: About 24 cookies
- Difficulty Level: Easy
Ingredients You’ll Need for Halloween Sugar Cookies
-
For the Cookie Dough:
- ¾ cup granulated sugar
- ¼ cup light brown sugar
- ½ cup salted butter (softened to room temperature)
- 1 large egg plus 1 egg yolk
- 2 tsps pure vanilla extract
- 1 tsp heavy cream
- 2½ cups all-purpose flour (spooned and leveled)
- 1 tsp baking powder
- ½ tsp baking soda
-
For the Royal Icing:
- 2 pasteurized egg whites
- 1½ tsps vanilla extract
- 3 cups powdered sugar
- 1 tsp orange juice (or lemon juice, or water, your call)
- Food coloring of your choice (go bold, go spooky)

How to Make Halloween Sugar Cookies
-
Preheat the Oven:
Begin by heating your oven to 375°F (190°C) and covering your baking sheet with parchment paper or a silicone mat to ensure even baking and easy cleanup. -
Cream the Butter and Sugars:
In a mixing bowl, beat together your softened salted butter with both sugars until the mixture is light, fluffy, and creamy, about four minutes. This step is crucial for soft and tender cookies. -
Add the Egg Mixtures:
Incorporate the whole egg and the extra yolk for richness, along with the vanilla extract. Mix until smooth and silky. -
Add Cream:
Pour in a tablespoon of heavy cream to make your cookies extra tender and melt-in-your-mouth delicious. -
Mix Dry Ingredients:
In a separate bowl, combine the flour, baking powder, and baking soda. Gradually fold this mixture into your wet ingredients. Be gentle here; overmixing can lead to tough cookies. -
Chill the Dough:
Wrap your dough tightly in plastic wrap and chill it in the refrigerator for at least 20 minutes. Chilling helps keep your cookie shapes sharp and enhances the flavor. -
Roll Out the Dough:
When ready, lightly flour your work surface and roll the dough out evenly to about a quarter-inch thick for cutting out your spooky shapes. -
Cut Out Shapes:
Use your favorite Halloween cutters to create fun shapes and carefully place the cutouts onto your prepared baking sheet. -
Bake the Cookies:
Bake for 9 to 10 minutes, or until the edges are slightly golden while the centers remain soft. -
Cool the Cookies:
Let the cookies rest on the baking sheet for a few minutes to firm up before transferring them to a wire rack to cool completely. -
Make the Royal Icing:
For the icing, whisk the egg whites and vanilla until soft and frothy. Gradually add powdered sugar until stiff peaks form. Add orange juice or your chosen liquid a teaspoon at a time until the icing flows smoothly but holds its shape. -
Color the Icing:
Divide the icing into bowls, keep one white, and dye the others with fun Halloween colors like orange, purple, and green.
Tips for Success
- Chill the Dough: Always chill your dough for the recommended time; it ensures clean cuts and helps with cookie shape retention.
- Watch the Baking Time: Cookies should be taken out when the edges start to turn golden and the centers still look a bit soft.
- Use Parchment Paper: This not only prevents sticking but also aids in even heat distribution.
- Be Gentle When Rolling: Use flour as needed to prevent sticking, but avoid adding too much; it can affect the cookie’s texture.
Easy Variations
- Flavor Add-Ins: Experiment by adding almond extract or spices like cinnamon for an extra flavor twist.
- Lemon or Orange Zest: Incorporate citrus zest into the dough for a bright, refreshing flavor.
- Chocolate Chips: For a fun twist, mix in mini chocolate chips or Halloween-themed sprinkles.
- Nut Options: Add finely chopped nuts or swap some of the flour with almond flour for added flavor and texture.
What to Serve with Halloween Sugar Cookies That Taste as Good as They Look
- Milk: Nothing beats a classic! A tall glass of milk pairs perfectly with the sweetness of sugar cookies.
- Hot Chocolate: For a cozy touch, serve these cookies with a warm mug of hot chocolate.
- Halloween Punch: A festive drink enhances the spooky vibe and makes the cookies even more enjoyable.
- Ice Cream: Sandwich two cookies with your favorite ice cream for a delightful treat.
Storage and Reheating
- Refrigerator Storage: Store cookies in an airtight container at room temperature for up to one week.
- Freezer Storage: Freeze unbaked cookie dough for up to three months. Roll into balls and freeze on a baking sheet before transferring to a freezer-safe bag.
- Best Reheating Method: Reheat cookies in a microwave for about 10-15 seconds or in an oven at 350°F for a few minutes to revive their texture.
Common Mistakes to Avoid
- Overbaking: Always check cookies a minute or two before the recommended time; they will continue to cook on the baking sheet.
- Overmixing Dough: Mix just until the flour is incorporated to prevent tough cookies.
- Skipping the Chill: Not chilling the dough can lead to spreading and loss of shape during baking.
- Ignoring Icing Consistency: Ensure your royal icing has the right flow; too runny won’t hold shapes, while too stiff won’t spread.
Halloween Sugar Cookies: Background & Cultural Inspiration
Halloween Sugar Cookies have their roots in various cultures’ traditions surrounding the fall season. Originally, sugar cookies were made for Christmas, but they have been adapted for Halloween as people embraced the festive spirit of the holiday. The custom of decorating cookies is akin to making gingerbread cookies for Christmas, allowing families to come together in creativity and celebration. Traditionally, these festive cookies reflect seasonal changes with playful designs and flavors, and they have found a prominent place in autumn festivities.
Frequently Asked Questions
Can I use margarine instead of butter?
Yes, margarine can be used in place of butter, though it may slightly affect the flavor and texture of the cookies.
How can I prevent my cookies from spreading too much?
Chilling the dough is the best method to help maintain the cookie’s shape during baking.
Can I make these cookies in advance?
Absolutely! Prepare the dough and store it in the fridge or freeze it for later use.
How should I store leftover cookies?
Keep them in an airtight container at room temperature for up to a week for best freshness.
Can I use pasteurized egg whites instead of fresh ones?
Yes, using pasteurized egg whites is safe and a good alternative in royal icing if raw eggs are a concern.
Final Thoughts
Halloween Sugar Cookies are a delightful way to celebrate the spookiest time of the year. Easy to prepare and fun to decorate, they are sure to become a favorite family tradition. So gather the kids, unleash your creativity in the kitchen, and enjoy these sweet, festive treats this Halloween season!
PrintHalloween Sugar Cookies

Delightful sugar cookies perfect for celebrating Halloween, featuring fun shapes and easy decorating.
- Prep Time: 30 minutes
- Cook Time: 10 minutes
- Total Time: 40 minutes
- Yield: 24 cookies
- Category: Dessert
- Method: Baking
- Cuisine: American
- Diet: Vegetarian
Ingredients
- ¾ cup granulated sugar
- ¼ cup light brown sugar
- ½ cup salted butter (softened to room temperature)
- 1 large egg plus 1 egg yolk
- 2 tsps pure vanilla extract
- 1 tsp heavy cream
- 2½ cups all-purpose flour (spooned and leveled)
- 1 tsp baking powder
- ½ tsp baking soda
- 2 pasteurized egg whites (for icing)
- 1½ tsps vanilla extract (for icing)
- 3 cups powdered sugar (for icing)
- 1 tsp orange juice (or lemon juice, or water, your call)
- Food coloring of your choice
Instructions
- Preheat the oven to 375°F (190°C) and prepare a baking sheet with parchment paper.
- Cream the softened butter with both sugars until light and fluffy.
- Add the egg and yolk along with vanilla extract and mix until smooth.
- Pour in the heavy cream to enhance tenderness.
- Mix the flour, baking powder, and baking soda separately, then fold them into the wet mixture gently.
- Wrap the dough in plastic wrap and chill for at least 20 minutes.
- Roll out the dough on a floured surface to about a quarter-inch thick.
- Cut out shapes using Halloween cookie cutters and place them on the baking sheet.
- Bake for 9 to 10 minutes until edges are golden, but centers remain soft.
- Cool the cookies on a wire rack after letting them rest on the baking sheet.
- Whisk egg whites and vanilla for icing until soft and frothy; add powdered sugar until stiff peaks form.
- Divide the icing and color as desired.
Notes
Chill the dough for clean cuts and to maintain cookie shape during baking. Use parchment paper for even heat distribution.












